Sunday, January 30, 2011

cubbies and a jewlery holder


Two new cubbie cubes and a jewlery holder cap off the
 new bench and mirrow that Kaydence was given for Christmas


This project was found on Ana White's site. She made some great
little crates that she suggested you could use in your bathroom.


They are exactly 12x12 so you can use them for your scrapbook paper too.

You decide.

Got any other ideas? Let me know what you used them for.


At the moment these ones are empty but are meant for make-up,
hair accesories... We'll see what it looks like in a week or two.


The next item was an old picture frame that was found in
the house when we moved in that I transformed into a jewlery holder.


I screwed in cup holder to the bottom to hold necklaces, bracelets etc.


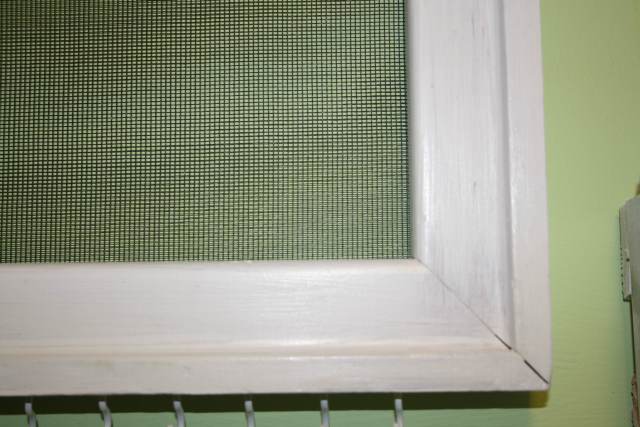
Some screen was added to the back of the frame to make
an area where earrings can be hung.


and it was all topped off with a pretty white satin ribbon.

Best part... is that it actually was done before the end of January
since this was belated Christmas gift.

~ Marlene

Thursday, January 27, 2011

Bathroom Cabinet


So we needed a new cabinet in the bathroom...
Yes, that means I get to do some more building!


It is also my first attempt at making doors.
I picked up the hardware for this cabinet when I made
my trip across the border on Tuesday.


I bought the black hinges and some pretty leaf knobs.


The bottom door has beadboard as a backing.
There is also a drawer that needs to go in above the door.


The top door will have glass and I am planning
to put a pattern on it and frost it.


Yes, it is coming along quite nicely.
I'm enjoying this project and love how it is looks!

~ Marlene

Locker Bins


Finally found perfect bins for the top shelves of my lockers.

Yes those lockers that I have been working on for a number of months now.

So last week I showed you the bottom of the lockers....


This week it is the top...


Today I had to make my way across the border to find some wood lath.

We apparently don't carry that in Canada, so off I went.

Not only do they carry wood lath at Lowes. They also have a great selection of organization ideas. I so enjoyed looking through the aisles and then VOILA there they were. The bins I had been searching for.

So what do you think of the top of my lockers?

Very soon I hope to post the pics of the whole finished project.

~ Marlene

Thursday, January 20, 2011

Monogrammed Crates - tutorial


I needed to find a way to identify the crates for each of my children. I had a number of different ideas that I came across, but most were of a material that would get wet / ripped off / .....


After adding furniture tacks to a recent project I thought they would be just the ticket for this project.


I began by choosing a font that would have a little shape to it.
Unfortunately at the moment I cannot remember the same of that said font.


I enlarged it to fit on one page each, a size that would work with the size of my crates.  


I centered each page on the crate and then added the furniture tacks along the lines of each letter. Once they were stuck down I pulled the paper away and nailed the tacks in.


I enjoyed putting this project together.
Also the kids thought it was great to see their letter materialize on their crate.

Now, if it gets them to put their boots and shoes away I will be thrilled!


~ Marlene

Monday, January 17, 2011

Tiles are on the locker base!


This was my first attempt at tiling EVER.

I have had this locker project that I want to complete and it has taken on a life of its own. I began with the simple plans that Ana White posted on the Braden Entryway system. Not so simple with all the changes that I have made.

I decided that I wanted to tile the bench part and add crates underneath as shoe storage. This weekend was the tiling part of the project. I read/googled what I could and then gathered my materials.

The tiles fit very well and there was little cutting that needed to be done.
However, I made sure to lay all the tiles out first before I put any adhesive down or made any cuts.


A ready to use adhesive called AcrylPro that I found at Home Depot.


Also some spacers to make sure that my tiles lie straight and are evenly spaced.
These spacers was 1/8".


I also had a chance to learn how to use a wet saw for the first time.
That is a story all in itself for another day.

Everything went extreemly well until I came to the end and realized that
I was just short of adhesive and could not finish the last two rows.

Yes, that's right!


Here's to keeping it real!


Ah well tomorrow is another day.

Marlene

Crates with Wheels and Monograms

The crates that I made a few months ago have received the finishing touches.


First, I added four wheels/casters to the bottom of each crate.


Second, I added a Monogram for each one of my children.
I searched for a font that would be more than just a straight line.
I wanted some curve to it.
*I cannot remember or find that font at the moment.
When I do I will update this post.

K for Kaydence


J for Josiah


T for Tyrel


The wheels work very well and even roll over the mat that is down for the winter slush and snow.

Now if I can get everyone to put their boots and shoes in the bins we would be doing Fantatstic!


Next time I will post a tutorial on how I added the monograms for these crates.

Don't they look awesome? Have a great idea or project? Tell me about it.

Monday, January 10, 2011

Washer Dryer Stand

People said I would not like to bend down to put my laundry in and out...

They were right. I don't.

So what do I do when I hate the pedastles that come with the machines?

Build my own of course!


Here are some pics of the laundry room redo over at show and tell. As soon as I saw these photos I knew I had found the solution to my laundry basket problems and the need for gaining height under my machines.

Other solutions I was considering was a laundry basket dresser from ana white.


But I wasn't okay with the fact that it would take up so much floor space. I was in need of more storage that took up less space... BTW don't you just love those wooden boxes too?

Another great idea in white instead of black.

Yes this is totally going to work for our space!


It all seems like a simple enough process.

And once again Ana has read my mind. Here are the plans she just made for this washer/dryer stand.

I'll let you know once my project gets under way and definately post pics of the finished product.

Got any great projects that you're thinking of doing? Where are you finding your inspiration?

Marlene

Tuesday, January 4, 2011

Kaydence's Upholstered Bench


This was really a labour of love. I was so excited to be working on Kaydence's bench. It was a Christmas present and I was dying to share it with everyone but had to wait. This is the simple bench by Ana White with a slight alteration. I acutally made the bench 1/3 of the orginal lenght to fit between Kaydence's bed and dresser.

To learn how to upholster a bench I went on-line and found a few people who had tutorials on how to do this. At the blog Pretty Hand Girl you can find a step by step process. I followed this one closely.

This is a picture of the next to final stage where I covered all the foam with an old T-shirt. I cut off the sleeves and neck part and voila a perfect fit. After pulling everything tightishly and stapling it to the bench; I added the pretty fabric (a thick cotton table cloth on sale for $5) and finished it off with pretty black furniture tacks.

The next time I do a project though I will be looking for furniture trim on a roll. Haven't found it in a local store but I know it's out there. This picture is again from Pretty Hand Girl on a chair project that she did. That will be so much easier and probably a whole lot straighter too.


(photo courtesy of Pretty Handy Girl)

With the finished, individual, trim tacks the project looked like this.


Thanks for stoppping by and checking out my lovely upholstered bench.
It gave me great joy to
make it,
give it
and then share it with you all.

Have any great projects of your own to share? I'd love to see them.